
環境
windows 11 64bit
Visual Studio 2022
MySQL Server 8.0.25 – X64
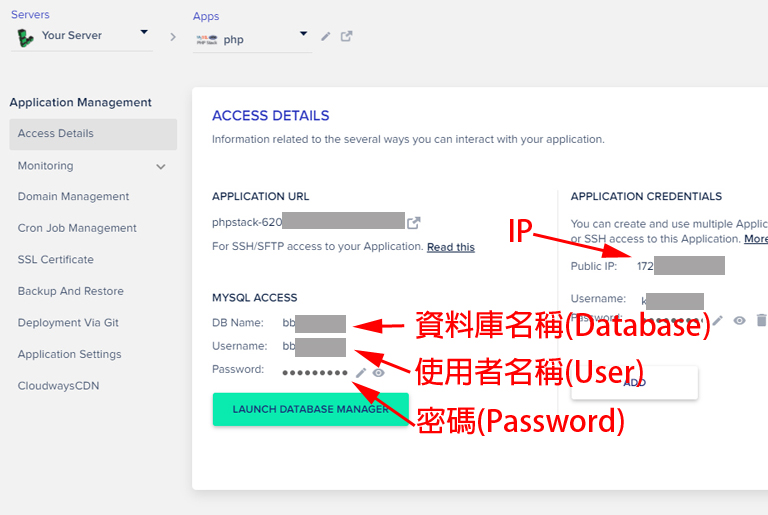
遠端主機 cloudways
MariaDB 10.4
1. 在 cloudways 架 php 伺服器

2. 在 cloudways 設定資料庫和建立資料表
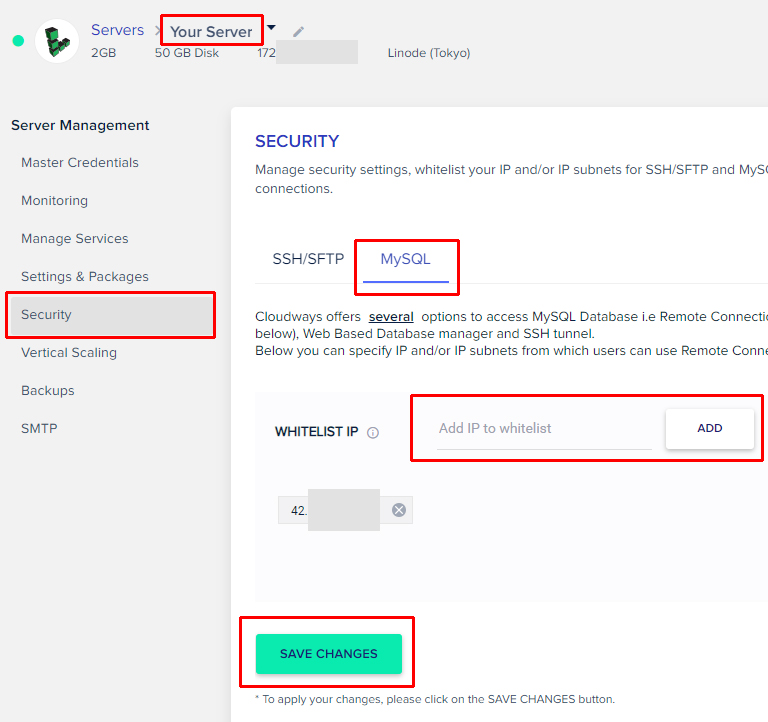
將自己的 IP 加入白名單,這很重要!!!!
將自己的 IP 加入白名單,這很重要!!!!
將自己的 IP 加入白名單,這很重要!!!!
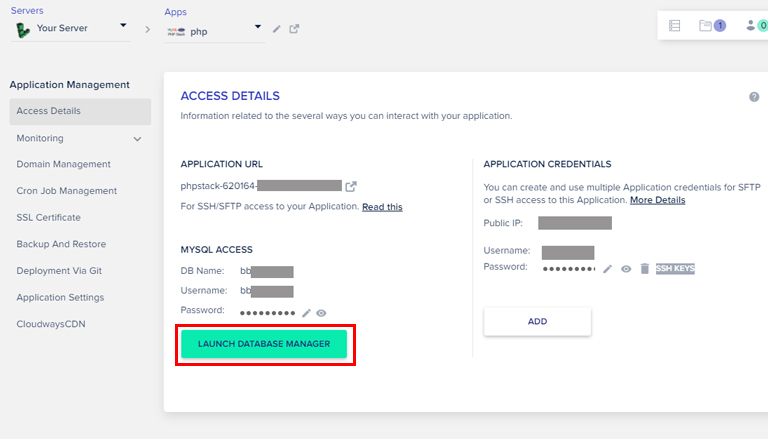
從這裡進入資料庫
在這裡輸入 SQL 指令建立資料表

SQL 指令
-- ----------------------------
-- Table structure for test01
-- ----------------------------
DROP TABLE IF EXISTS `test01`;
CREATE TABLE `test01`  (
  `id` int(11) NOT NULL,
  `int_test` int(11) NOT NULL,
  `char_test` char(20) CHARACTER SET utf8 COLLATE utf8_unicode_ci NOT NULL,
  `varchar_test` varchar(100) CHARACTER SET utf8 COLLATE utf8_unicode_ci NOT NULL,
  `text_test` text CHARACTER SET utf8 COLLATE utf8_unicode_ci NOT NULL
) ENGINE = InnoDB CHARACTER SET = utf8 COLLATE = utf8_unicode_ci ROW_FORMAT = Compact;

-- ----------------------------
-- Records of test01
-- ----------------------------
INSERT INTO `test01` VALUES (1, 10, 'a', 'Harry Potter', 'The novels chronicle the lives of a young wizard, Harry Potter, whom are students at Hogwarts School of Witchcraft and Wizardry.');
INSERT INTO `test01` VALUES (2, 20, 'b', '哈利波特', '是一部兒童奇幻文學系列小說,描寫主角哈利波特在霍格華茲魔法學校7年學習生活中的冒險故事。');
INSERT INTO `test01` VALUES (3, 30, 'c', 'ハリー・ポッター', '1990年代のイギリスを舞台に、魔法使いの少年ハリー・ポッターの学校生活。');

SET FOREIGN_KEY_CHECKS = 1;

3. Visual Studio 2019
設定為 x64
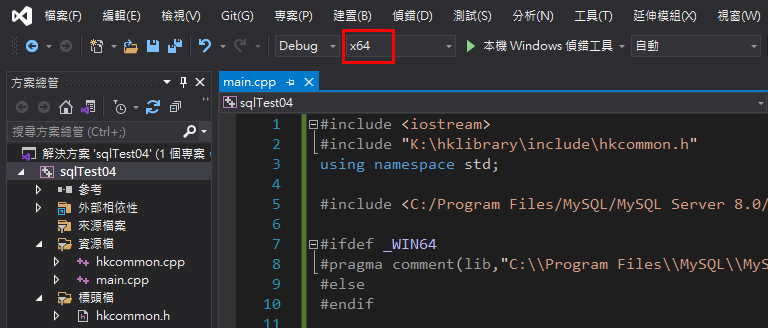
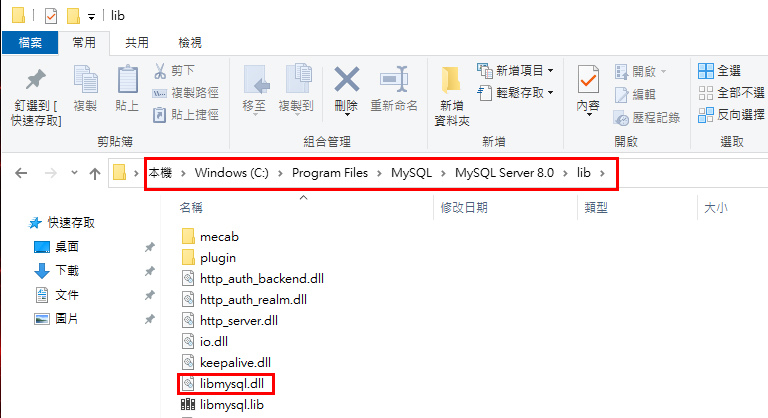
把 MySQL 安裝資料夾裡的 libmysql.dll 拿出來跟執行檔放在一起
(小提醒:關於 MySQL 安裝資料夾的部分寫在本文後面)
.
main.cpp
#include <iostream>
using namespace std;

#include <C:/Program Files/MySQL/MySQL Server 8.0/include/mysql.h>

#ifdef _WIN64
#pragma comment(lib,"C:\\Program Files\\MySQL\\MySQL Server 8.0\\lib\\libmysql.lib")
#else
#endif

int main()
{
	MYSQL* mysql = new MYSQL;
	if (mysql_init(mysql) == 0)
	{
		cout << mysql_error(mysql) << endl;
	}

	mysql_set_character_set(mysql, "utf8");

	char szIP[256] = "127.0.0.1";	//不需要加 port
	char szUser[256] = "username";
	char szPassword[256] = "password";
	char szDatabase[256] = "database";

	if (mysql_real_connect(mysql, szIP, szUser, szPassword, szDatabase, 0, NULL, 0) == 0)
	{
		cout << mysql_error(mysql) << endl;
	}

	char szSql[256] = "select * from test01";
	if (mysql_query(mysql, szSql) != 0)
	{
		cout << mysql_error(mysql) << endl;
	}

	MYSQL_RES* res;
	res = mysql_store_result(mysql);
	if (res == 0)
	{
		cout << mysql_error(mysql) << endl;
	}

	MYSQL_ROW row;

	char szID[256] = "";
	char szIntTest[256] = "";
	char szChar[256] = "";
	char szVarChar[256] = "";
	char szText[1024] = "";

	wchar_t szUniChar[1024] = L"";
	wchar_t szUniVarChar[1024] = L"";
	wchar_t szUniText[2048] = L"";

	while (row = mysql_fetch_row(res))
	{
		strcpy_s(szID, row[0]);
		strcpy_s(szIntTest, row[1]);
		strcpy_s(szChar, row[2]);		//這個取出來會是 utf8 字串
		strcpy_s(szVarChar, row[3]);	//這個取出來會是 utf8 字串
		strcpy_s(szText, row[4]);		//這個取出來會是 utf8 字串

		cout << "szID = " << szID << endl;
		cout << "szIntTest = " << szIntTest << endl;
		cout << "szChar = " << szChar << endl;
		cout << "szVarChar = " << szVarChar << endl;//utf8 字串直接印會是亂碼

		//這些是我自己寫的函式庫,可以把 utf8 改成 unicode 並印出
		hkstr::UTF8ToUnicode(szUniChar, szChar);
		hkstr::UTF8ToUnicode(szUniVarChar, szVarChar);
		hkstr::UTF8ToUnicode(szUniText, szText);
		hkstr::PrintfUnicode(L"szUniChar = %s\n", szUniChar);
		hkstr::PrintfUnicode(L"szUniVarChar = %s\n", szUniVarChar);
		hkstr::PrintfUnicode(L"szUniText = %s\n", szUniText);

		cout << endl;
	}

	//clean
	row = 0;
	mysql_free_result(res);

	mysql_close(mysql);
	mysql_library_end();
	if (mysql != 0)
	{
		delete mysql;
		mysql = 0;
	}

	system("pause");
	return 0;
}
執行結果

小提醒:MySQL 安裝資料夾是安裝 MySQL 才會有的
可以參考這篇文章試試看
https://husking-studio.com/cpp-mysql-c-api/
然後把 C:\Program Files\MySQL 資料夾複製出來
再把 MySQL 刪掉
如果出現這個錯誤:因為找不到 libssl-1_1-x64.dll

這個檔案在 C:\Program Files\MySQL\MySQL Server 8.0\bin 資料夾裡
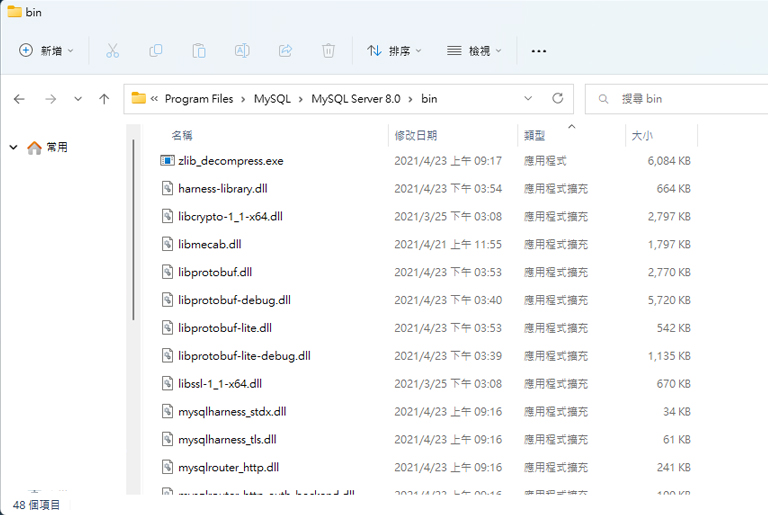
把 dll 檔拿出來跟執行檔放在一起就好